Pages

Showing posts with label Cake. Show all posts

01 October 2010

Sticky Toffee Pudding

I promised you cake. I also promised that you'd have it last weekend. I'm obviously not very at keeping promises (but I'm working on it). I'm making it up to you now by giving you my most favorite cake in the whole wide world, even though it's not the cake I promised originally (I'm hoping that by sharing my favorite recipe, you'll forgive me for not giving you the other cake).


You see, I was going to make my hubby a cake. It was going to be filled with coconut and pecans and caramel and be in the shape of one of his most favorite things. Sadly, that did not happen. You see, I forgot about inviting his 13-year-old sister to stay Friday night and promising his 9-year-old sister that i would go see her on Saturday and making plans with my mum on Sunday. It was a busy and exhausting weekend, so I did not make cake. I will make it though for our anniversary later this month as a special treat just for him (and of course I'll share it with all of you).


Back to Sticky Toffee Pudding. I don't remember the first time I heard of this cake. I don't remember what initially drew me in. I'm not a pudding fan, and not being English, I just assumed it was like Jello pudding. How wrong was I! It's not that kind of pudding at all (you can look here for a breakdown of what the British call puddings). It's stocky and sweet and best served very warm with either some custard or lightly whipped cream or even vanilla ice cream. Obviously, I'm not picky and will eat it straight from the pan with nothing on top or any of the three I just mentioned. It's like Green Eggs & Ham. I will eat it here or there. I will eat it anywhere! Definitely one of those desserts I could eat after supper every night.


Sticky Toffee Pudding
Recipe from All Recipes, adapted by multiple users from the site

1 3/4 cups dates, pitted and chopped (I used plain old raisins)
1 teaspoon baking soda
1/3 cup butter
3/4 cup white sugar
2 eggs
1 1/8 cups self-rising flour
3/4 cup packed brown sugar
1/3 cup butter
2/3 cup evaporated milk
1 teaspoon vanilla extract
1 1/2 cups boiling water to cover
  1. Preheat oven to 350 degrees F (175 degrees C).
  2. In a small bowl combine the dates and baking soda. Pour enough boiling water over the dates to just cover them.
  3. Cream 1/3 cup of butter with the white sugar until light. Beat in the eggs and mix well to combine.
  4. Add the flour and date mixture (including water) to the egg mixture and fold to combine. Pour the batter into one 8 inch round baking pan.
  5. Bake at 350 degrees F (175 degrees C) for 30 to 40 minutes. Let cool, slice and serve with warm caramel sauce.
  6. To Make Caramel Sauce: In a small saucepan combine the brown sugar, evaporated milk, vanilla and 1/3 cup butter. Cook over medium heat and bring to boil. Turn heat down and simmer for 5 minutes, stirring occasionally. Use immediately (you can do like I did and use the extra caramel sauce to top the slices of pudding).

01 January 2010

Starting the Year Off Right

I wanted so badly to make something that would be a hit with anyone that set eyes on it. Who was I kidding?!? We all know that I'm not the best at decorating cakes. Did that stop me from making a 14-layer cake? Not at all.


Before you get all bug-eyed and think, "She's completely lost her mind. Fourteen layers?!?" It's not what you think at all. I came across the recipe on Bakerella and just knew it was what I was looking for. Fourteen super thin layers of yellow cake sandwiched with a chocolate ganache then frosted with a chocolate buttercream, it was love at first sight.


I set out to make the cake early this afternoon. I took my eggs and butter out of the fridge to come to room temperature while I made some fun necklaces and played a computer game all while watching Dr. Who (it really was a nerd's dream in my apartment today). When I finally got bored with being a nerd, I realixed it was almost 6:00 P.M. Where in the world did my day go? Needless to say, I haven't gotten the cake frosted with the buttercream but I did get the rest of the cake and ganche finished and assembled. It actually works in my favor that I was lazy since now I won't be able to eat the cake tonight and can save it for dinner at my parents' on Sunday (I'll be bringing you my dad's outrageously hot chili so be ready with some milk and corn bread).


Here it is in all of it's unfrosted glory! It can be eaten this way; I just think it looks prettier and more deceptive with the buttercream. Imagine the surprise when the cake is finally cut and there are 14-layers of yellow cake peeking out of the chocolate! I think I need to go have some chocolate now... Enjoy!


Fourteen Layer Cake w/ Chocolate Ganache
Recipe via Bakerella via Oprah via The Smith Family (I didn't feel the need to change a thing for once)

 
4 1/2 cups all-purpose flour , sifted

1 1/2 teaspoons baking powder
1/4 teaspoon salt
1 1/2 cups (3 sticks) unsalted butter , at room temperature
2 1/2 cups sugar
6 large eggs , at room temperature
3 cups milk
1 1/2 teaspoons vanilla extract
3 cups sugar
1/2 cup unsweetened cocoa powder , preferably Dutch process
1 cup (2 sticks) unsalted butter , cut up
1 can (12 ounces) evaporated milk
1 tablespoon vanilla extract

  1. Position racks in the center and bottom third of the oven and preheat to 350°. Lightly butter the bottoms and sides of 14 8-inch pans and line the bottoms with rounds of parchment paper. Your best bet is to purchase the disposable pie pans so that you don't have to wait for your pans to cool and then clean them before doing another batch.
  2. To make the layers, sift together the sifted flour, baking powder and salt. Sift the mixture one more time, and set aside.
  3. Beat the butter and sugar in the bowl of a heavy-duty electric mixer fitted with the paddle blade on high speed until light in color and texture, about 3 minutes. Beat in the eggs, one at a time. Scrape down the bowl and be sure the mixture is well-blended. On low speed, add the flour in 3 additions, alternating with 2 additions of the milk, beginning and ending with the flour, and beat until smooth, scraping down the sides of the bowl often with a rubber spatula. Beat in the vanilla. Using a 2/3 of a cup for each layer, spread the batter evenly in the pans. It will make a thin layer.
  4. Staggering the pans on the racks so they are at least 2 inches from each other and the sides of the oven and not directly over each other, bake the layers until they feel firm when pressed in the centers and are beginning to pull away from the sides of the pans, about 12 minutes (I did 4 at a time for the first three batches, then the last two; I cooked all for 12 minutes and had no problems). Cool in the pans for 5 minutes. Invert the layers onto cake racks, remove the parchment paper, and cool completely. Repeat the procedure until all 14 layers have been baked and cooled.
  5. To make the icing, bring the sugar, cocoa, butter and evaporated milk to a full boil in a large saucepan (the biggest one you've got or there will be a giant chocolate puddle; trust me on this one). Reduce the heat to medium-low and cook until the icing has thickened slightly (it will resemble chocolate syrup but will thicken as it cools), about 3 minutes. Stir in the vanilla. Let the icing cool until thick enough to spread, but still pourable.
  6. Place a layer of cake on a wire rack set over a jelly-roll pan. Spread with a few tablespoons of the icing, letting the excess run down the sides. Stack the remaining cakes, icing each layer. Pour the remaining icing over the top of the cake. If you wish, smooth the icing on the edges to cover the sides. Place pecan halves around the top perimeter of the cake. Let stand until the glaze sets. (The cake is best served the day it is made. To store, cover loosely with plastic wrap and refrigerate for up to 1 day.)

24 June 2009

Italian Cream Cake


Those of you still reading my humble little blog know that I promised yesterday to bring you the recipe for the cake I made for my mom's birthday.


I had made this cake only one other time before this weekend. One night we had a couple of friends over and hosted an Italian night. The cake had come out so nicely, it stayed with me begging me to make it again. When I asked my mom what she wanted for her cake, all she could come up with was chocolate. To be completely honest, I was sick of chocolate cake and didn't really want to post another less than a month after the last one. Don't get me wrong. I still love chocolate cake. This was just a nice alternative.
This cake is insanely rich and a bit dense. Top that with cream cheese frosting, and it should be downright illegal. I don't know about you, but I think cream cheese frosting makes everything better.

Another thing I think makes almost anything better: coconut. I am addicted to the stuff. I could literally sit and eat handfuls of the shredded stuff that sits in the baking aisle at Wally World. I love to order pina coladas at restaurants especially when it's topped with some toasted coconut. This cake is perfect for the coconut person. Not only is it mixed in with the batter, I pressed it into the sides before serving. I hope the wait was worth it for everyone. I've got a pretty fun meal to post tomorrow. Enjoy!

Italian Cream Cake
Recipe from All Recipes

1 cup butter
5 egg yolks
1 teaspoon baking soda
2 cups all-purpose flour
5 egg whites
2 cups white sugar
1 1/2 cups buttermilk
1 cup chopped walnuts
1 cup flaked coconut
1 (8 ounce) package cream cheese
1/2 cup butter
3 1/2 cups confectioners' sugar
1 teaspoon vanilla extract
1/4 cup chopped walnuts

  1. Preheat oven to 350 degrees F. Cream together 1 cup butter or margarine, egg yolks, and 2 cups white sugar. Alternately mix in flour and buttermilk. Add baking soda. Mix in 1 cup walnuts and coconut.
  2. Beat egg whites, and fold into batter. Pour batter into three greased and floured 9 inch round cake pans (I only used two pans because that was all I had; it worked fine, I just kept my eye on the pans as they baked).
  3. Bake for 20 to 25 minutes in a preheated 350 degrees F (175 degrees C) oven.
  4. Combine cream cheese, 1/2 cup butter or margarine, confectioners' sugar, and vanilla extract. Spread onto cooled cake. Top iced cake with chopped walnuts (or do like I did and press extra coconut around the outside).

18 June 2009

Taste Test Part 1

In October, my best friend will marry her boyfriend. There has been a flurry of wedding planning going on, with me spending almost every weekend with them trying to help as best I can (I planned mine for almost three years so I'm practically an expert...OK, not an expert). When my friend told me what she had planned for her wedding cake, I dropped dead on the spot. Well, not dead, but my heart did stop beating for a split second. She was going to order three sheet cakes from a grocery store and stack them herself. I could not let this happen. This is the most important day in her life, besides the two days when her babies were born.
Being the selfless person that I am (please pardon the ego; I'm not really this self-absorbed), I offered to make her cake for free. All I asked was that she supply the ingredients (we're talking boxed cake mix so it'll be easier but homemade frosting and fillings).
So we had a little chat. "What flavors do you want for your tiers?" I asked. She knew she wanted the bottom layer to have an amaretto flavor (I'm still working out the kinks for this one). She turned to her fiance and asked what he wanted. "Red velvet," he mumbled through a mouthful of Doritos. Well, sorry dude, that's what flavor the groom's cake is so let's go with something else. How about lemon??? The other tier is going to reminiscent of a Black Forest Gateau.
I actually made the lemon and black forest cakes. I just forgot to take pictures of the latter (just pretend one of these cakes is chocolate with some cherry puree peeking out over the whipped cream). I have to make it again anyway. Since this is just a taste test, I didn't frost them or even bother to make them look pretty. I was happy just to get them level. We decided that the lemon needed more lemon flavor (that's what I get for going to boxed route), but that is easily fixed with lemon zest and juice. The black forest needed more cherry (I pureed a can a Bing cherries, but it was a bit too watery; I didn't want the top layer to slide off as I drove across town with it). Below is the recipe for the whipped cream filling I used for both (not that you really need it since it's so easy). Next time, when I separate it into two batches, I'll add lemon zest to the lemon one.
Whipped Cream
2 cups heavy whipping cream
1/2 Tbl vanilla extract
2 Tbl white sugar (this is a guess, I didn't measure too well; I wanted it to be just sweet enough)
  1. In a clean mixing bowl, whip heavy cream to soft peak stage. Add vanilla and sugar and continue to beat until stiff peaks form.

This can be modified with different extracts (almond would probably be really good). I may even scrap the whole whipped cream idea and go with a buttercream instead.

03 June 2009

Birthday Cake and Cupcakes!


I hadn't really planned on sharing the actual recipe for my dad's birthday cake for two reasons: it has a super secret ingredient in it that he would beat me for putting in the cake (three guesses what it is, makes the cake super moist). Since he reads my blog, I didn't want to piss him off unnecessarily by revealing something so heinous. The second reason is that I didn't take any pictures of my work. I had only planned on posting pictures of the finished cake and cupcakes.
I decided to make my Nana's cheesecake last night. I had been looking at cheesecake recipes and remembered that I still had hers hidden away in my recipe box untouched. Knowing I didn't have all of the ingredients on hand, I ran to the grocery store and got what I needed. When I got home, I saw that Nana doesn't make a crust for hers. That's OK. I'll make one anyway (I did not just spend money on a box of grahams to not use them). I pulled out Dorie Greenspan's Baking cookbook and made a crust according to her directions. I made the filling, adding one ingredient at a time to my mixer. As I poured the filling into my precooked crust, I realized that I had made a terrible mistake: too much filling, not enough pan.
I just could not post another fail so close to the last one (I'll still post it though along with the recipe). It was my own lack of foresight that made the cheesecake go wrong from the get go. There's even more story to the whole debacle so hopefully you'll still be around to read it in a day or so.
Anyway, here is the recipe for the cake I made for my dad as well as the cupcake recipe. The cake also had a secret filling that very few people knew about because I wanted it to be a surprise for my dad: PEANUT BUTTER! I personally don't care for peanut butter, but my dad loves chocolate and peanut butter together. What better way to surprise my dad than to give him his favorite flavors?


Sour Cream Chocolate Cake Layers
Recipe from The Cake Book
Makes 2 9-in cakes
2 2/3 cups all-purpose flour
2 1/2 cups sugar
1/2 cup natural cocoa powder (not Dutch processed)
1 1/2 teaspoons baking soda
1/2 teaspoon salt
3 large eggs, at room temperature
2/3 cup sour cream, at room temperature
1 tablespoon vanilla extract
10 tablespoons unsalted butter, melted and cooled
2/3 cup safflower oil or corn oil
1 1/4 cups ice-cold water
  1. Position oven rack in center of oven; preheat oven to 350°; grease the bottom and sides of two 9-inch round cake pans; line the bottom of each pan with a round of parchment paper and grease the paper; dust the paper and sides of the pans with flour.
  2. Into a bowl, sift together the flour, sugar, cocoa powder, baking soda, and salt; whisk to combine then set aside.
  3. In another bowl, whisk together the eggs until blended; whisk in the sour cream and vanilla extract until blended; set aside.
  4. In the bowl of an electric mixer, using the paddle attachment, mix the melted butter and oil together on low speed.
  5. Add in the cold water and mix to blend.
  6. Add in the dry ingredients all at once and mix on med-low for 1 minute.
  7. Add in the egg mixture and mix for another minute, until well blended, scraping down the sides of bowl with rubber spatula as needed.
  8. Scrape the batter into the prepared pans, dividing evenly.
  9. Bake the cakes for 35-40 minutes, until a pick comes out clean.
  10. Cool the cakes in the pans on wire racks for 15 minutes. Invert the cakes onto the racks, peel off the paper, and cool completely. Frost with your favorite frosting (I used two different frosting recipes from Tish's book).

Rainbow Cupcakes
Recipe inspired by Omnomicon

1 box of white cake mix
1 package gel food colors
Cupcake liners (mine made 18 because I didn’t pay close enough attention to what I was doing)

  1. Prepare cake according to package.
  2. Divide batter into six bowls, using most for red and least for purple (I did one cup for each color but should have used more for red and worked my way down to purple; probably would have made 24 cupcakes that way).
  3. Color each bowl of batter until desired color is reached (you want it bright so don’t be stingy).
  4. Using a tablespoon, fill each cupcake liner with about 2Tbl of red batter and 1Tbl of orange. Use a teaspoon for all the other colors (yellow gets a heaping tsp, green gets 1tsp, blue gets slightly less than 1tsp, and purple gets about 1/2tsp).
  5. Layer each color as close to the center of the previous color until all six colors have been used and filled each cupcake liner about ¾ of the way.
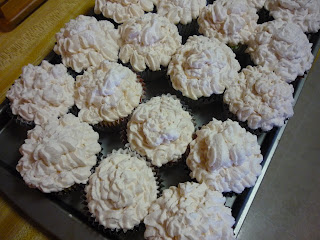
  6. Bake according the directions on the package. Allow to cool before frosting (I made a strawberry whipped cream which was just heavy whipping cream and strawberry extract; you may use whatever you would like though).

This is a picture of my cousin's 2 1/2 year old son enjoying one of the cupcakes. Isn't he cute?